In this seventh part of this series we will install VMware ESXi 8 and will perform initial configuration.
Open VMware Workstation. Go to File menu and select New Virtual Machine

Select Typical and click Next.

Select Use ISO image and browse and select the VMware ESXi 8 ISO file. Click Next to continue.

Enter the desired virtual machine name, for example ESXI01. Click Next.

Enter the disk size as 20GB, Select Store virtual disk as a single file. Click Next.

Click on Customize Hardware.

Leave the CPU and Memory to default or change to your liking. Click on Network Adapter and select Custom. Select VMnet1 virtual network from the drop down menu. Click on Add to add additional network interfaces.

Select Network Adapter and click Finish.

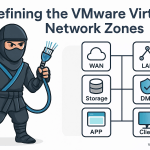
Click on Custom and select VMnet1 virtual network from the drop down menu. The first two NICs will be used for the management network for the ESXi host.

Click on Add to add additional network interfaces and configure them as shown below and click on Close once done. We will be adding two NICs per network zone to configure redundant network switches.

As shown above, we have configured the network adapter 1 and 2 as VMNet1 (MGMT, vMotion), adapter 3 and 4 as VMnet2 (ISCSI Storage), adapter 5 and 6 as VMNet3 (WEB / DMZ), adapter 7 and 8 as VMNet4 (APP / DB), adapter 9 AND 10 as VMNet5 (Client) zone.
Click Finish to close the New Virtual Machine Wizard and power on the virtual machine.

Once the virtual machine powers on you will be greeted with the VMware ESXi Installer screen as shown below. Hit the Enter key to continue.

Press F11 key to accept the end user license agreement and continue.

Hit Enter key to continue.

Select the keyboard layout, hit the Enter key to continue.

Set the root password and hit Enter key to continue.

Hit F11 key to begin installation.

Once the installation is complete, hit Enter key to reboot the virtual machine.

Post reboot you will see the below screen. Hit F2 key to customize system.

Enter root password and hit Enter key to continue.

Use the arrow keys to scroll down to Configure Management Network and hit Enter.

Using arrow keys scroll down to IPv4 Configuration and hit Enter key.

Scroll down and hit Spacebar key to select Set static IPv4 address and network configuration and configure the IP address as below and hit Enter key.

Scroll down to IPv6 Configuration and hit Enter key.

Scroll up to Disable IPv6 (restart required) and hit Spacebar key to select it and hit Enter key to continue.

Scroll down to DNS Configuration and hit Enter key.

Scroll down to Use the following DNS server addresses and hostname, hit the Spacebar key to select it and configure the DNS configuration as shown below. Hit Enter key to continue.

Hit Escape key and hit Y key to apply changes and reboot the host.

Once the reboot is complete, you will be presented with the below screen. You can see the URL you can use to access the web interface for administering the ESXi host.

Open any web browser and enter the url http://10.100.1.23/ or http://esxi01/ (if you have done the host file entries). Enter the username as root and password set during the installation to login.
Note: With Broadcom taking over VMware things have changed a lot and for you to proceed further with these tutorials you will need an ESXi 8 host license key. So make sure you have one and have activated and assigned the license to the ESXi host before proceeding. Google for it and you should be able to find one.

Once logged in, click on Networking and then Virtual switches. Select vSwitch0 and click Edit Settings.

Click on Add uplink to add second vmnic to this virtual switch.

Select vmnic1 for the uplink 2. Do not click on save yet. Next we will change the security settings for the virtual switch.
Expand the Security section and check the radio button Accept against the setting Promiscuous mode and click on Save to save the changes. Because we are running the ESXi server inside VMware Workstation (Nested ESXi), in order for the virtual machines / VMkernel interfaces created inside the ESXi servers to talk to the other devices in the network, we will have to enable promiscuous mode on all the virtual switches we will be creating.

Next we will create the VMkernel nic for the vMotion network.
Click on Networking, VMkernel NICs tab and then click on Add VMkernel NIC.

Enter vMotion for the New port group. Click on the drop down menu for virtual switch and select vSwitch0.

Scroll down and expand the IPv4 settings. Click on Static and enter the IP address and Subnet mask as shown below. Click on the drop down menu for TCP/IP stack and select vMotion stack. Click Create.


Create one more virtual machine ESXI02 following above steps and configure the IP address as 10.100.1.24 and configure the vMotion VMkernel NIC. We will configuring cluster post vCenter server installation in the upcoming articles.

Discover more from VirtShinobi.blog
Subscribe to get the latest posts sent to your email.